Another shop project

Dave951

Happy to be here
Supporting Member
Joined
Jan 6, 2017
Messages
2,095
Location
NC
Rating - 100%
2   0   0
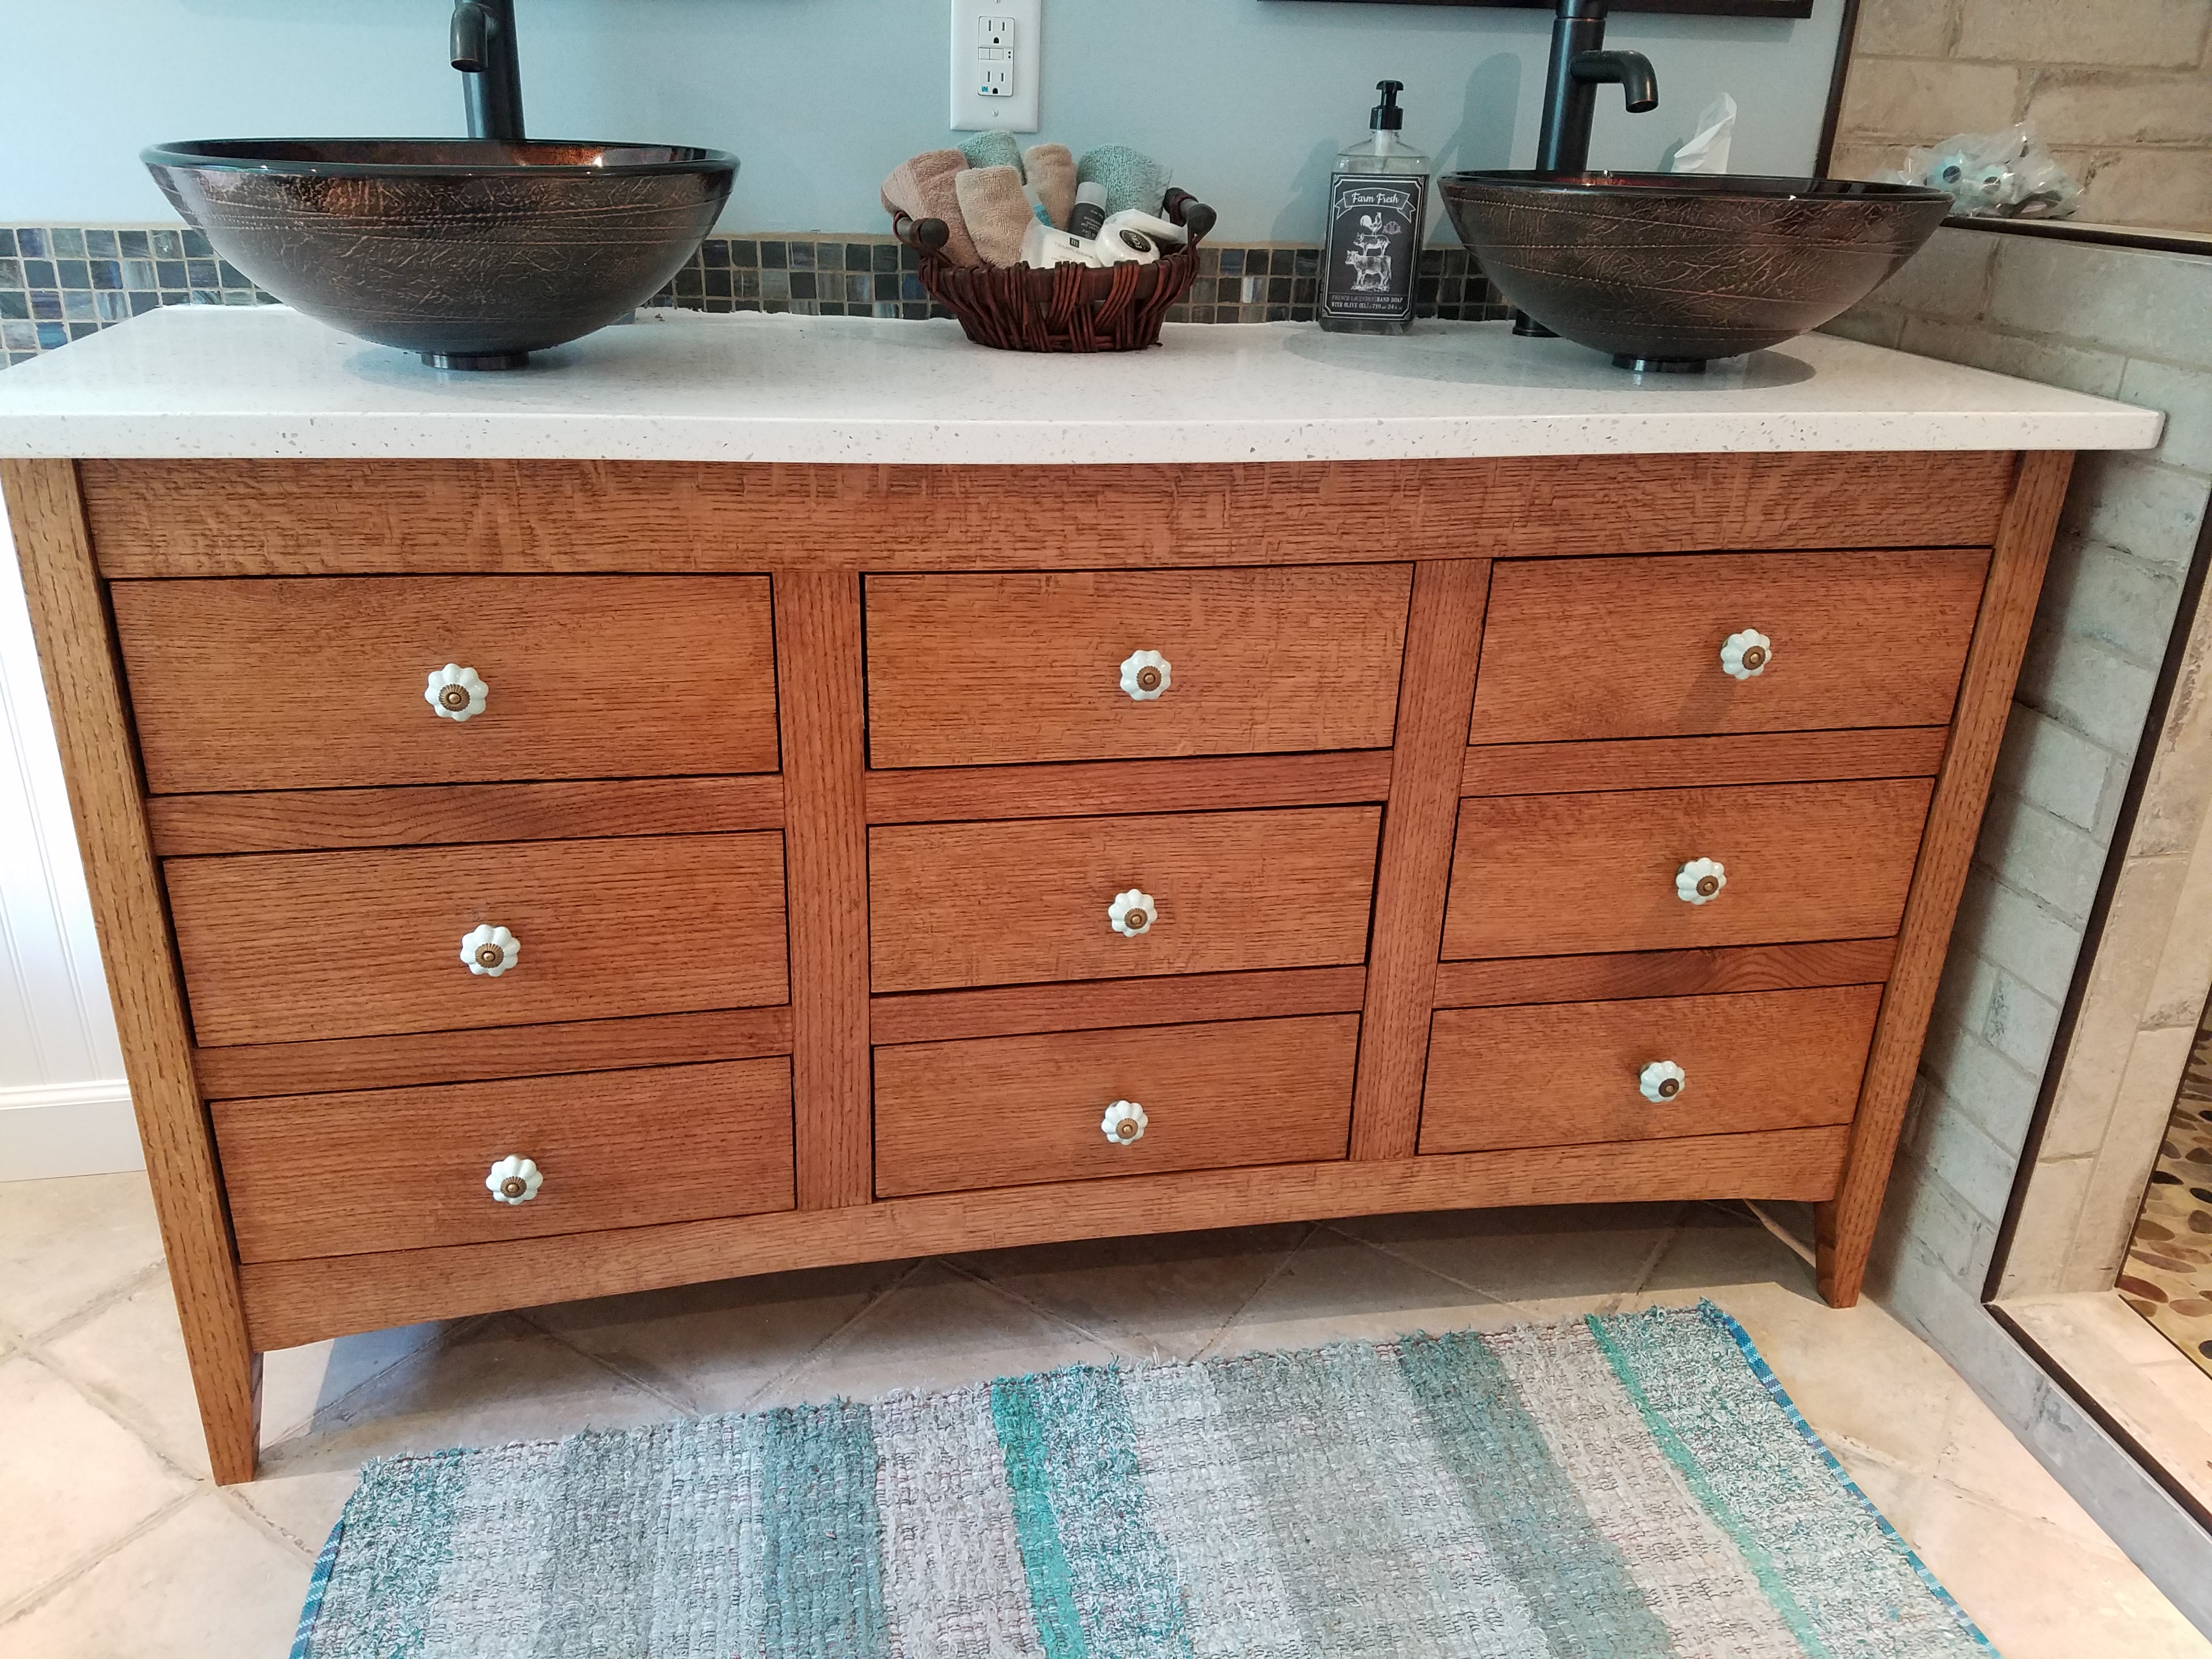
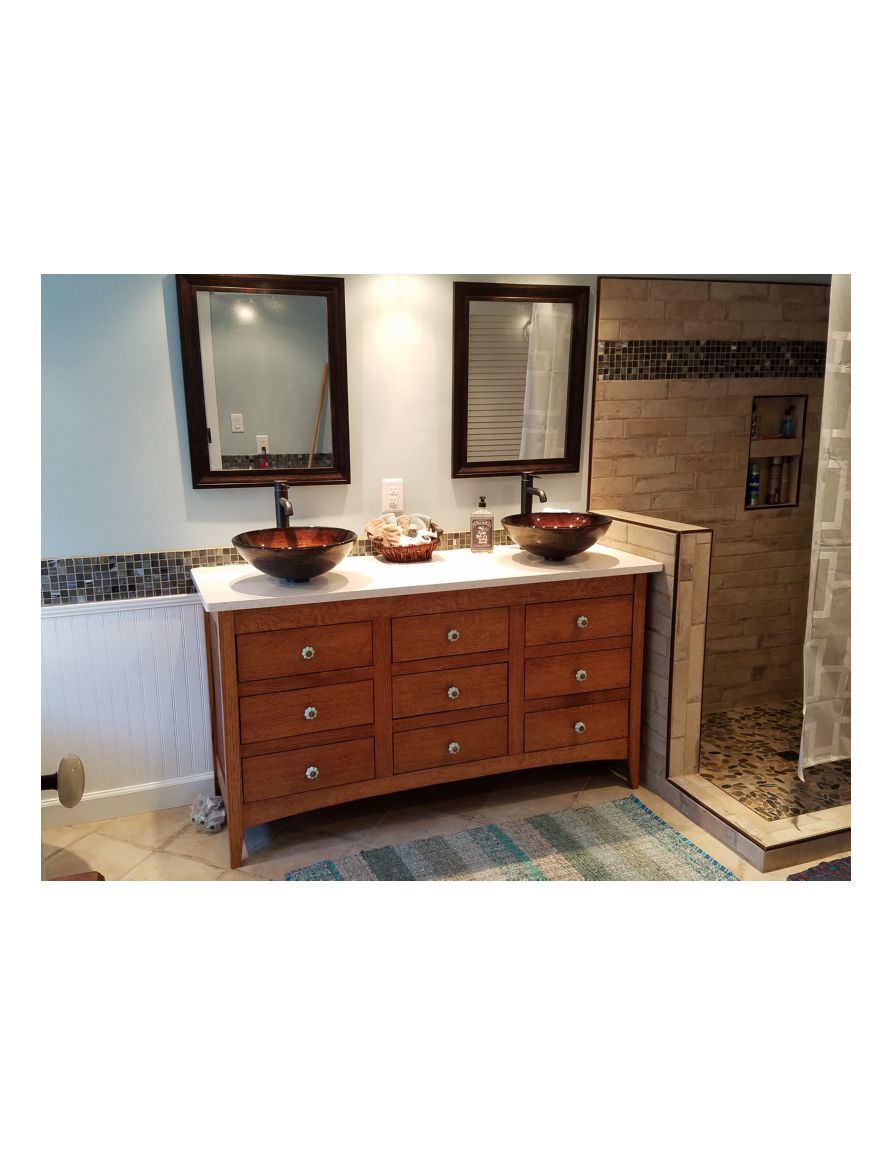
Client has a late 1800s/early 1900s house and wanted a master bath remodel. Wood is 1/4sawn red oak locally harvested. Did tile, shower, in floor heat, antique claw foot, wainscoting, recess lighting.
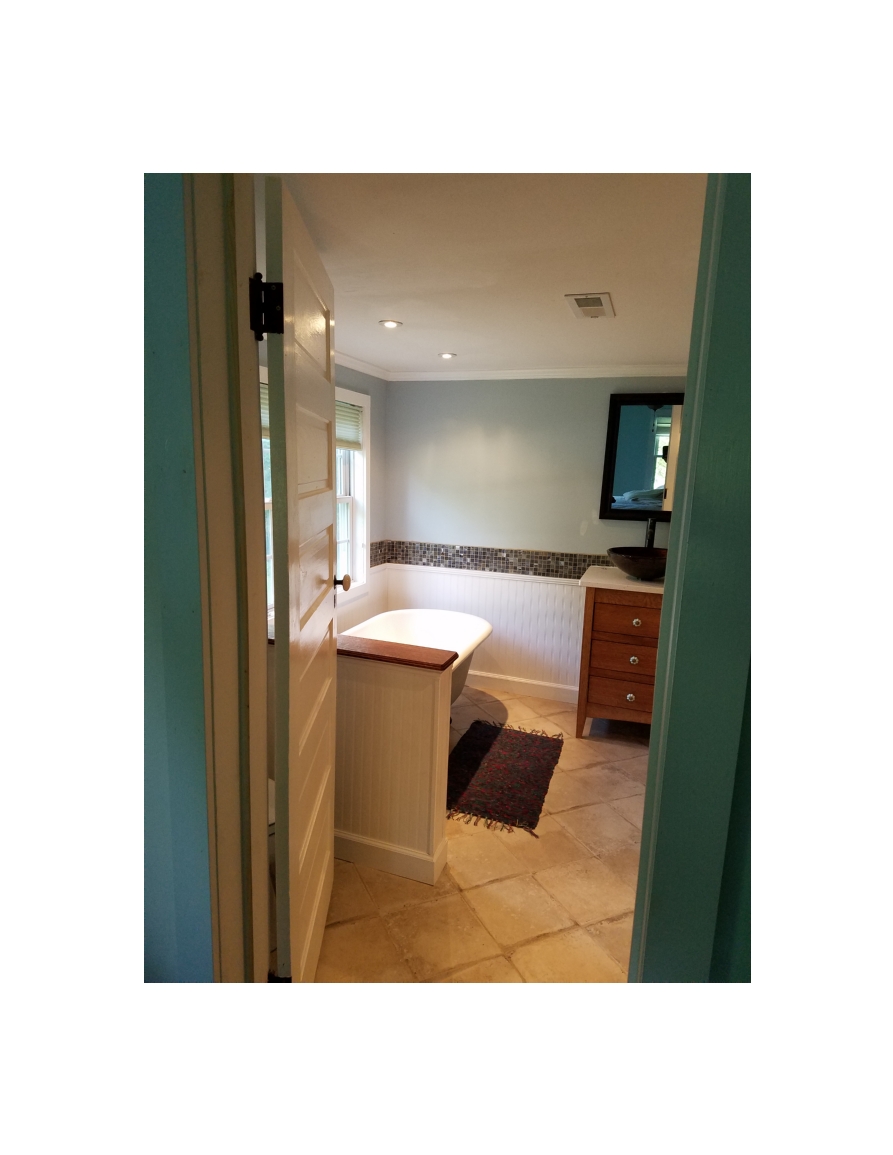
original-c30864922278a7df668fcd5396cbcef6.jpg


original-749b036e126c9f1139d24ee6e275863f.jpg


original-da70349170c5a043bbeba5d67725d468.jpg
 
Very nice craftsmanship Dave! Your design is very clean and showcases the beauty of the QSRO.

Scott
 
Thanks for the comments. The owner is pretty happy with it too. I'm a big fan of Stickley and the Arts and Crafts movement, hence the lines and proportions. BTW, there were no plans of this thing, I had to build it based on space available and the size of the vessel sinks.
 
You did well with the proportions.

on a side note, how does that open shower work? I would think that it would tend to splash outside...
 
Pic was taken before the glass was installed. We had a glass co do that bit. Shower enclosure is one of those frameless units and what metal bits there are on it are ORB and it blends very nicely with the rest of the room.

Original shower was one of the corner units from a big box, you know ones that are smaller than a phone booth. We removed it and a jaccuzi corner garden tub. I still have both if anybody is interested. Since the house was built about 1895ish the walls for the shower had to be trued and somewhat squared. The shower floor took a solid day to get the pebbles to look right and the in floor heat extends into the shower, so no cold tiles underfoot while taking a hot shower.
 
Is the in floor heating expensive/difficult? (For a moderate DIYer)

I've been tossing around the idea for when I put tile in our bathroom/kitchen
 
Dave, Beautiful work. Did you mill the oak or buy? I am looking for a sawmill that will saw my logs wood or a source for good furniture making hardwood.
 
Deplorable me;n100751 said:
where are the claw feet?

You can just see the end of the tub in the last pic.

Funny thing about that tub. I was doing my usual trolling through an architechural salvage yard (antique stuff) and spotted this flawless clawfoot off to one side. I called over to the owner and asked for a price, he says it was on hold for another client. I asked just how firm this hold was if the client was prone to not carry through. He said it was a pretty sure deal but I had first dibs if it fell through. Fast forward to the planning stage with my client and we were discussing clawfoot tubs. I mentioned there were several places to get them, she said she already had one. Not thinking too much further about that we went on planning. Come to find out, the tub I tried to buy at the yard was the same tub! So I still got to install it, just not at my house. That tub is circa 1910, has not chips in the finish, and has the original faucets on it. All I had to do was clean it up, repack and polish the original faucet, source the correct plumbing (it's still available!) and grunt it in. Yes, cast iron is a bit heavy.
 
Last edited by a moderator:
Dan;n100825 said:
Dave, Beautiful work. Did you mill the oak or buy? I am looking for a sawmill that will saw my logs wood or a source for good furniture making hardwood.

Oak was obtained from a guy in the area who has a portable sawmill. He also has a kiln for drying it. The wood was in 4/4 and 5/4 rough and I planed it to thickness in my shop.
 
J.R.;n100727 said:
Is the in floor heating expensive/difficult? (For a moderate DIYer)

I've been tossing around the idea for when I put tile in our bathroom/kitchen

It's not hard at all. Current draw is the consideration for the circuit you tap into and that is dependent on how much area you plan to heat. The element goes down in the thinset and this is where preplanning is crucial. Plan where the thermostat goes, fish the wires to the elements down through the wall and through the base, that's where the elements in the thinset have to end. There are other considerations of where to place thermostat sensors, but this isn't rocket science if you can read the instructions and there are several systems out there designed for the DIY type. The difference between what you'd get in a big box and what I used from Schluter is installation flexiblility. Schluter allowed for complete control over the size and shape of the area, but to use it, you have to use their Ditra membrane. I've got some pix of what the zones look like in the project documentation.

The real danger for a DIY, or pretty much anybody for that matter, is being ham fisted putting down the thinset over the elements. It is possible if you're really burning the thinset in of nicking the insulation of the elements with the trowel and shorting it out. Key here is be careful with the thinset trowel.

The real "fun" part of this project was getting the tile into the 8x12 walkin closet at the end of the bathroom. Since this is an old house, the transition to that room from the master bath had a 6in drop and the floor sloped in that room from that drop up to the back wall. It was enough that you could really, really tell it was sloping. I had to take out that slope and bring it to the level of the bathroom floor so the tile wass contiguous through the entire room. The finished floor isn't dead nuts level, but over the length of 22ft from one wall, through to the back of the walkin, the floor is out only 3/8in over 22ft. Big change from what was there.
 
Not a fan of the tile or color choices, but I am a BIG fan of that cabinet! Looks really nice. I love A&C as well.
 
The color choice completely complements what she wanted in the master bedroom. The tile has a old, tumbled stone look. Pix don't do this justice. Here's what happened out in the master bedroom.
[IMG2=JSON]{"data-align":"none","data-size":"full","src":"http:\/\/imgdump4.novarata.net\/image.uploads\/26-02-2017\/original-7ff2cbff36efed6b8722dc6234e72a9f.jpg"}[/IMG2]Old fireplace had been drywalled over. I did some archectural archaeology and found the original. When it was walled over, mantle was discarded and bricks and hearth removed. I rebuilt the firebox in the damaged area with antique salvaged brick that matched what was still in situ. We had a chimney guy inspect the chimney for defects. Gas co installed the ventless logs. I designed, built the mantle and did the masonry. Art on the mantle is work of the homeowner. She's really good and has had work sold in a couple gallerys.
 
Holy crap, this is gorgeous!
Excellent work!!
 
Back
Top Bottom