Here is a set of grips I made for my Star BKM. I want honest opinions about the checkering job. Seriously tell me what you think. What is good about them as well as what is wrong.
Have at it.
Don't know why 1 is upside down
Last edited:

") (If only I was as funny as I think I am...)
(If only I was as funny as I think I am...)The spacing on a couple of lines on the right panel looks a wee bit off & that panel is a bit shorter than the other, but otherwise great work.
The spacing on a couple of lines on the right panel looks a wee bit off & that panel is a bit shorter than the other, but otherwise great work.


How did you inlet the revolver stocks?
Exacto knives and a butt load of patience.
Got any hair left on your head??? Or have you pulled all of it out??
WowExacto knives and a butt load of patience.


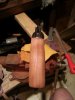
 And here they are with a second coat of stock finish.
A lot better than I could do!
Terry
I tried checkering several years ago and found out that my eyes are not good enough to see what I was doing. So I just make smooth grips.
I see that you have a passion for this. If you are notfar from the Concord area, you could stop by my shop and I can give you some pointers from someone with 20 years experience. Keep up the good work