ThomasC.
Well-Known Member
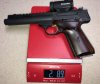
@FredB and I upgraded my Browning Buck Mark Field Target recently.
The factory trigger pull originally measured (Lyman gauge) about 4.5 #. Gun is about 3 years old and has probably had 2500 or rounds down the pipe.
I have been shooting a Salyer BE Range Officer 45 with a 3.5 # trigger to drool over as well as a CZ Shadow2 with a 2.75 # “slightly tuned” trigger. Since I started single hand BE Shooting Stance the heavier Buck Mark trigger pull was scattering things a bit.
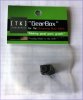
Read a lot of articles. Talked to some folks. Liked the curved stock trigger and did not want to swap that out. Found favorable write ups and reviews of the Tandemkross Sear Spring Gearbox upgrade. Ordered one.
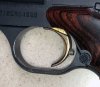
Decided to drill and tap the Browning trigger for an 8-32 X 0.25” set screw to limit overtravel.
The Field Target has individual grips so disassembly and reassembly is easier. You SHOULD watch several videos on the tear down and the reassembly and pay particular attention to the firing pin assembly. Trigger was removed with two pins. Slide was removed. NOTE. The tear down was done over a white surface which made it easy to locate small stray parts. Don't lose or forget the tiny "C" clip for the guide rod. It will take forever to reassemble without it.
FredB had made a 1.050 Día half round concave fixture for the trigger to nest in while drilling. This needs to be around 0.330 – 0.350” wide, which is a bit narrower than the trigger. The fixture was soft wood and we taped the sides of the trigger with painters’ tape and set the fixture in a machinist’s vise and clamped it in place. We center punched the trigger to locate the drill bit. Use a 1/8” drill bit and put it behind the trigger around the magazine release. This is where you will adjust or set the overtravel, so you want the set screw to be horizontal then.
Drilled a pilot hole and then the tap hole. The 8-32 requires a #29 or 0.136 die bit. We then tapped hole….in retrospect, recommend that the tap just break or cut threads on the back. We ran the tap in full length. The tap was not a precision one….so maybe it was a bit oversized. The 8-32 X 0.25” set screw fits loosely. If you only tapped it say ¼ turn and the tap penetrated the trigger, then try the set screw. You need some interference or friction fit as it exits the trigger. Mine works fine. I chose to use pipe dope rather than Loctite as I only had Red and Green (or Blue) is what most gunsmiths use as you can usually break it free without heating. When you tap, you can test the threads so that you have some tightness on the final threads…but some sealer will be needed.
We then reassembled the trigger to the frame and proceeded to install the TandemKross gearbox. This installation went smoothly, thanks to the excellent video guides on the Tandemkross website. Pay attention to setting the trigger transfer bar pin on the left side.
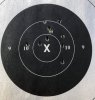
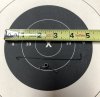
After the pistol was completely reassembled, the results were well worth it. The trigger pull was reduced from around 4.5 # to 2.75 #. THAT is amazing. The pre-travel or take up CAN be reduced but it is already quite short and we decided it was not worth the trouble. However, the over travel stop adjustment really is the icing on the cake. This was already a good shooting gun, but now it is a great shooting gun.
The factory trigger pull originally measured (Lyman gauge) about 4.5 #. Gun is about 3 years old and has probably had 2500 or rounds down the pipe.
I have been shooting a Salyer BE Range Officer 45 with a 3.5 # trigger to drool over as well as a CZ Shadow2 with a 2.75 # “slightly tuned” trigger. Since I started single hand BE Shooting Stance the heavier Buck Mark trigger pull was scattering things a bit.
Read a lot of articles. Talked to some folks. Liked the curved stock trigger and did not want to swap that out. Found favorable write ups and reviews of the Tandemkross Sear Spring Gearbox upgrade. Ordered one.
Decided to drill and tap the Browning trigger for an 8-32 X 0.25” set screw to limit overtravel.
The Field Target has individual grips so disassembly and reassembly is easier. You SHOULD watch several videos on the tear down and the reassembly and pay particular attention to the firing pin assembly. Trigger was removed with two pins. Slide was removed. NOTE. The tear down was done over a white surface which made it easy to locate small stray parts. Don't lose or forget the tiny "C" clip for the guide rod. It will take forever to reassemble without it.
FredB had made a 1.050 Día half round concave fixture for the trigger to nest in while drilling. This needs to be around 0.330 – 0.350” wide, which is a bit narrower than the trigger. The fixture was soft wood and we taped the sides of the trigger with painters’ tape and set the fixture in a machinist’s vise and clamped it in place. We center punched the trigger to locate the drill bit. Use a 1/8” drill bit and put it behind the trigger around the magazine release. This is where you will adjust or set the overtravel, so you want the set screw to be horizontal then.
Drilled a pilot hole and then the tap hole. The 8-32 requires a #29 or 0.136 die bit. We then tapped hole….in retrospect, recommend that the tap just break or cut threads on the back. We ran the tap in full length. The tap was not a precision one….so maybe it was a bit oversized. The 8-32 X 0.25” set screw fits loosely. If you only tapped it say ¼ turn and the tap penetrated the trigger, then try the set screw. You need some interference or friction fit as it exits the trigger. Mine works fine. I chose to use pipe dope rather than Loctite as I only had Red and Green (or Blue) is what most gunsmiths use as you can usually break it free without heating. When you tap, you can test the threads so that you have some tightness on the final threads…but some sealer will be needed.
We then reassembled the trigger to the frame and proceeded to install the TandemKross gearbox. This installation went smoothly, thanks to the excellent video guides on the Tandemkross website. Pay attention to setting the trigger transfer bar pin on the left side.
After the pistol was completely reassembled, the results were well worth it. The trigger pull was reduced from around 4.5 # to 2.75 #. THAT is amazing. The pre-travel or take up CAN be reduced but it is already quite short and we decided it was not worth the trouble. However, the over travel stop adjustment really is the icing on the cake. This was already a good shooting gun, but now it is a great shooting gun.