Undermount bathroom sink (physical mounting question)

CarolinaColtCollector

It’s never a “War Crime” the first time.
2A Bourbon Hound OG
Life Member
Multi-Factor Enabled
Joined
Aug 26, 2019
Messages
2,399
Location
Fuquay and 40/42
Rating - 100%
71   0   0
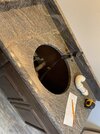
I’m helping a friend reassemble a bathroom and about have everything wrapped up, except this one thing…
4E56F328-1B17-4B74-82E9-E06FCDE65E2C.jpeg

This countertop was supplied for the bathroom and I was assuming it used a set in sink option, but after researching it more, it looks like it is cut for an under mount sink.
EB53E609-8D37-4ED6-9B7E-1DE2802B34CC.jpeg

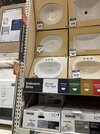
The supplied instructions on the sink I purchased (that’s wrong, but I’ll get the right one) said you have to drill holes in the counter and epoxy anchors in to assist with holding the sink in place.

My issues/questions are this:

What material is the counter? And can I drill it with a masonary bit?

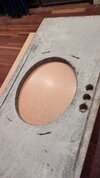
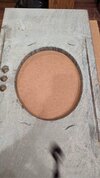
The counter already has these dovetailed type cuts in it, is there some sort of anchor type I’m missing? Or do you wedge the inserts into these holes and epoxy them in?

If I can find a surface mount sink, I’m open to installing that too.

E27AA18E-9845-4CB1-8C53-C7F91953337B.jpeg

9B11F126-0500-4BF1-B461-9CB8B078CA37.jpeg
 
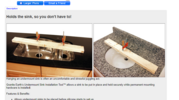
You can use a 2x4 and this style of clamp from the top if you want or you can cut some bracing underneath to hold the sink tight to the underside while the sealant sets up:

1670338889023.png

For those inlets on your top, you can slide these sinkit clamp assemblies into them and basically bind your sink basin to the underside of the top:

 
You can use a 2x4 and this style of clamp from the top if you want or you can cut some bracing underneath to hold the sink tight to the underside while the sealant sets up:

View attachment 556084

For those inlets on your top, you can slide these sinkit clamp assemblies into them and basically bind your sink basin to the underside of the top:


Thanks! I’m assuming you are referring to the slot clip style ones? I can see how that would basically put the sink in a bind
 
You can use a 2x4 and this style of clamp from the top if you want or you can cut some bracing underneath to hold the sink tight to the underside while the sealant sets up:

View attachment 556084

For those inlets on your top, you can slide these sinkit clamp assemblies into them and basically bind your sink basin to the underside of the top:


Make sure you use 100 percent silicone also take a rag soaked with denatured alcohol to clean the flange of the sink and the surface of the stone to get any oils and dirt of for a clean adherence. run a 1/4" bead of silicone on the outer perimeter of the flange surface of the sink. i have set hundreds of these over the years like this.

it would be better to have a mechanical fastener as well but being a vanity youll be fine with silicone.
 
Thanks! I’m assuming you are referring to the slot clip style ones? I can see how that would basically put the sink in a bind
@Darkhorse 's prep is spot on. Gotta make sure those surfaces are clean for that silicone to bond and cure properly.

Vanity sinks won't have a lot of weight in them but [2] fastening systems is always better than one.
 
The style the counter top was precut for perform better. As far as if you were to drill you need a granite and ceramic bit. Sold at big box stores.
 
Get some of these

some clear 100% silicone ( family dollar/general dollar has it cheaper than lowes)

If you have someone to help hold the sink in place, you don't need the clamp and board.

Acetone or denatured alcohol to clean the bottom of the top, rim of sink (obviously no flame near please)

slide the screw head into the slots in the stone, put silicone on the sink rim and put it in place.
put the clips and nuts on the screws, tighten up wing nuts
Make sure the sink is centered, snug the nuts

take glass cleaner/spic n span and spray the sink/stone joint, wipe finger in spray and then tool the silcone (acetone works too, but glass cleaner is cheaper and safer, either one breaks the surface tension of the silicone and lets you tool it without it smearing everywhere)
Take a dry paper towel and clean up without getting in the silicone.
Plumb the sink, but try not to run any water for 12-24 hours

You can put the faucet on first as long as your sure it won't be in the way of the sink.

If you want to be fancy I prefer this
Hush

But it is over kill on a vanity sink. A sink must be mechanically fastened in place, as the silicone is only a gasket to keep the water in the sink, not to keep the sink to the bottom of the top.

I love the guys that clip kitchen sink in. I get pretty good money to come out and fix it when the sink falls down, and it is going to fall down. The stoner saved 5 bucks, and cost you $500, good for the stoner, good for me, bad for you though.
 
Last edited:
I’m helping a friend reassemble a bathroom and about have everything wrapped up, except this one thing…

View attachment 556054

This countertop was supplied for the bathroom and I was assuming it used a set in sink option, but after researching it more, it looks like it is cut for an under mount sink.

View attachment 556055

The supplied instructions on the sink I purchased (that’s wrong, but I’ll get the right one) said you have to drill holes in the counter and epoxy anchors in to assist with holding the sink in place.

My issues/questions are this:

What material is the counter? And can I drill it with a masonary bit?

The counter already has these dovetailed type cuts in it, is there some sort of anchor type I’m missing? Or do you wedge the inserts into these holes and epoxy them in?

If I can find a surface mount sink, I’m open to installing that too.

View attachment 556056

View attachment 556057
Just wanted to follow up. Here’s how my granite supplier mounts sinks. This is mine in my house

F60729A5-BC96-420D-A99E-6C01B435C260.jpeg
 
Just wanted to follow up. Here’s how my granite supplier mounts sinks. This is mine in my house

View attachment 557839
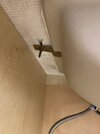
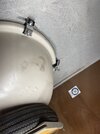
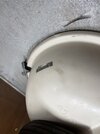
I ended up ordering some of the Sinkits the other day, assembly is in at the house and curing with a bottle Jack holding it against the counter. Letting it cure for a couple days before I lock the clips in. It was a doozy trying to set them in the beginning since every time the sink would move left or right, they would fall out. If they don’t seem to work, I’ll leave the bottle Jack in, and get some like yours are, since this counter is dovetailed the same.
 
Got 3 of the 4 clips in, whoever added the slots didn’t center them up on the hole, so one is slightly out of reach, still trying to get it locked in.

57F221F6-F35E-41AA-BC06-1A6A1F3E916B.jpeg65F49C35-840D-4320-A9E9-1E9A7EF1C717.jpeg
 
He’s tired from running around this house

Sink looks to be holding! Got the plumbing in, dumb question #3(?) If I’m putting sink leads onto copper shutoffs, and they have rubber flat washers in them, do I need to use Teflon tape?
 
He’s tired from running around this house

Sink looks to be holding! Got the plumbing in, dumb question #3(?) If I’m putting sink leads onto copper shutoffs, and they have rubber flat washers in them, do I need to use Teflon tape?

If you're using the flexible supply lines, you don't need teflon tape. They have integral rubber washers.
 
If you're using the flexible supply lines, you don't need teflon tape. They have integral rubber washers.
Awesome, that’s what I was assuming, using a 5” adjustable so I don’t pull the threads off the copper male ends while tightening it up.
 
Awesome, that’s what I was assuming, using a 5” adjustable so I don’t pull the threads off the copper male ends while tightening it up.
You should be using these. Lowes, Home Depot et all have them. Buy once, cry once.-
iu
 
His faucet has supply lines included no need for anything else...as stated no teflon the threads are not the sealing surface.
 
Back
Top Bottom