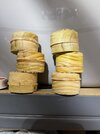
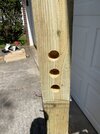
Homemade heavy duty car ramps (< $20)

RetiredUSNChief

Get over it, snowflake.
Charter Life Member
Multi-Factor Enabled
Joined
Dec 17, 2016
Messages
29,449
Location
SC to VA
Rating - 0%
0   0   0
Well...I priced the lumber tonight and it's not quite that cheap. But still a LOT cheaper than actually buying car ramps.

And these will NOT have that irritating problem all other car ramps have in my experience: they won't "scoot" as you try driving up them without having first somehow anchored them.

As an improvement to this guy's project, I wouldn't use a hook and eye as he does...I'd use a door hasp and a pin. For about the same price, it'd be sturdier.

These would weight about 40 pounds each, I'd estimate, what with a ten foot long 2 X 8 weighing about that.

If you consider this to be a bit "narrow" for truck tires, you could use 2 X 10's...for an extra 10 pounds. And twice the cost. Which is still a bit cheaper than most ramps.

I'm thinking about building a set.

 
my dad used to have a set like this [2x4 + 4x4] and i keep thinking of making a set for my truck - could use a tad more clearance under there, don't wanna buy new ramps and hate the scoot factor for sure!

i have a set of ramps i used to use for my car - - but then i replaced the suspension = a hair lower, now the front bumper pushes the ramps, making them useless; and the ramps aren't rated for the weight of the truck
 
ive thought of making a set of these before but havent done it yet. need to gi ahead and do it. although id probably just make them in 1 piece instead of hinged.
 
ive thought of making a set of these before but havent done it yet. need to gi ahead and do it. although id probably just make them in 1 piece instead of hinged.

I like the idea of being able to swing them out of the way for easier access from the sides. There are some things I could really go for in that direction.
 
He made a second video with some improvement suggestions.


I’m going to make some in the next week or so. Mainly because we’re waiting for an underglow kit to come in for my son’s Sentra, and have it up the ground will be very helpful. I think I’m going to tweak the design a bit, and make four do we can raise the whole car.
 
ive thought of making a set of these before but havent done it yet. need to gi ahead and do it. although id probably just make them in 1 piece instead of hinged.


Absolutely no engineering involved in these. I put them together 10-15 years ago based only on materials I had on hand. They will get a Honda high enough for an oil change. Any vehicle larger just gets you more clearance. White stuff is construction adhesive.


ramps.jpg


.
 
Gonna have to make a set of these - I would love a lift but cannot justify the $$ for now . . .

I have 12 foot ceiling out there so - - I also gotta figure out how to get up there and change the fluorescent bulbs out
 
Gonna have to make a set of these - I would love a lift but cannot justify the $$ for now . . .

I have 12 foot ceiling out there so - - I also gotta figure out how to get up there and change the fluorescent bulbs out
8' step ladder should do it for you. Buy one and return it later at HD or Lowe's. :)
 
I too should have got this 30 years ago. I store it under a queen size bed frame with OSB so I can store things over the lift.
Owned it over four years now, included set of truck adapters. It's $1K more expensive now.

BP Lift.png

 
Last edited:
nice, but i can just about guarantee you that I would forget to count how many bumps i went up and drive off the end. I appreciate that my plastic ramps have the dip where you're supposed to be and a lip to keep you from going further.
 
This is what I want . . .


Stores pretty flat, easy to keep out of the way..

Just can't justify the cost right now and the odds of finding a used one - - bah
 
Got my sketch done. I’ll use every inch of two 2x8x8 and four 2x8x12 boards. Gonna build four of them that have six levels (instead of just four). The only difference is the two for the rear won’t have the little block at the front. I’m going to use a piece of 2x4 for that block on the front ones, since I have some scraps here, so that’s not included in the calculation.

Current plan is to do the bottom boards out of pressure treated and the rest (other than the 2x4) out of standard boards. Is that gonna cause any problems? It’ll cut a little over $20 out of the wood cost. $61 this way, vs $82 with all pressure treated.

(The $61 jumps to $87 if I went with 2x10 instead of 2x8)
 
nice, but i can just about guarantee you that I would forget to count how many bumps i went up and drive off the end. I appreciate that my plastic ramps have the dip where you're supposed to be and a lip to keep you from going further.
That’s one reason I’m going to build mine just a little different. Shorter steps with a longer mid-level and top. 4”/4”/16”/4”/4”/16”.
 
Got my sketch done. I’ll use every inch of two 2x8x8 and four 2x8x12 boards. Gonna build four of them that have six levels (instead of just four). The only difference is the two for the rear won’t have the little block at the front. I’m going to use a piece of 2x4 for that block on the front ones, since I have some scraps here, so that’s not included in the calculation.

Current plan is to do the bottom boards out of pressure treated and the rest (other than the 2x4) out of standard boards. Is that gonna cause any problems? It’ll cut a little over $20 out of the wood cost. $61 this way, vs $82 with all pressure treated.

(The $61 jumps to $87 if I went with 2x10 instead of 2x8)
Use structural screws to anchor the front ramp stop block.
Have you measured the clearance in front of the rear wheels?
Are you going to use glue and screws?
 
Use structural screws to anchor the front ramp stop block.
Have you measured the clearance in front of the rear wheels?
Are you going to use glue and screws?
Yes, I measured in front of the rear tires last night before I started tying to calculate everything. It’ll fit three 2xwhatevers. If it wouldn’t, the rears would’ve hinged in two spots instead of one.

I’d just planned on screws. But I do have wood glue here and the thought crossed my mind at some point yesterday.
 
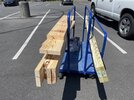
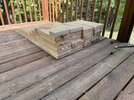
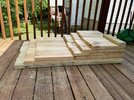
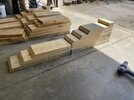
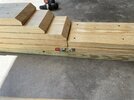
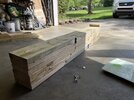
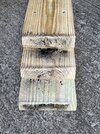
Messed around with them a little after church and lunch. Wanted to put a little bevel/slant/whatever across the front of each riser. Only thing I have to do that with is a circular saw, and it forces me to cut left-handed to get the correct angle. So, none are very straight…but good enough for this project. I intentionally didn’t cut all the way to the bottom of board so it wouldn’t be sharp and/or break off.

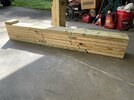
Got the hinge and latch on the first one after gluing and screwing…

4D4BB357-BC35-4172-87FA-163F7E55AB7C.jpeg
BF80D588-E8B6-4AC5-B775-C37B730F0F6F.jpeg
 
Well...I priced the lumber tonight and it's not quite that cheap. But still a LOT cheaper than actually buying car ramps.

And these will NOT have that irritating problem all other car ramps have in my experience: they won't "scoot" as you try driving up them without having first somehow anchored them.

As an improvement to this guy's project, I wouldn't use a hook and eye as he does...I'd use a door hasp and a pin. For about the same price, it'd be sturdier.

These would weight about 40 pounds each, I'd estimate, what with a ten foot long 2 X 8 weighing about that.

If you consider this to be a bit "narrow" for truck tires, you could use 2 X 10's...for an extra 10 pounds. And twice the cost. Which is still a bit cheaper than most ramps.

I'm thinking about building a set.
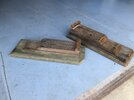

I got a set just like it
 
Nice! How was it driving up them?
He spun the tires a bit. Kept rolling back before he got to the middle landing. He was scared to damage something and it was only his second time going up ramps.
 
This is what I want . . .


Stores pretty flat, easy to keep out of the way..

Just can't justify the cost right now and the odds of finding a used one - - bah
Got one. Love it!

ETA: Used it to change rotors/pads/brake fluid on my M240i and it worked flawlessly. Haven’t had the F150 on it yet as I don’t have the truck adaptors, but it lifts so high that they may not be needed. Catch it on sale and get one. It is awesome.
 
Last edited:
I think you could easily drop 1/3 of the weight without any compromise to the strength.

For all the sandwiched pieces:

View attachment 610633


For the exposed pieces (top and bottom) swiss-cheese them with a forstner bit.

This is how Les Pauls are weight-relieved at the factory.
View attachment 610636

View attachment 610638 View attachment 610639View attachment 610640
I agree. And i attempted it with a hole saw. But it took a ridiculous amount of time and I quit. Got six holes drilled.

4F459A3B-7057-4289-A547-70F5C4DF6709.jpeg

A743CE27-FD8A-4727-B248-F1CBF46875B4.jpeg

I do have some spade bits that probably would’ve worked better…but I just wanted them done due to time. I could still go in from the top and/or bottom and drill some if I wanted.
 
Wet wood gets slippery, too, which is why I'm thinking I'm putting non-skid tape on mine. Wood can get wet from rain, humidity, temperature changes, etc.

As for weight reduction...careful with cutting out the centers of these. They're not plywood or microlaminate wood and doing so could cause them to split down the remaining grain when you park a few thousand pounds on them.
 
  • Like
Reactions: Me.
Wet wood gets slippery, too, which is why I'm thinking I'm putting non-skid tape on mine. Wood can get wet from rain, humidity, temperature changes, etc.
I don’t know how often I’ll actually use mine. But, I’m gonna order a roll of that 7” wide grip tape and see if it makes a difference.
 
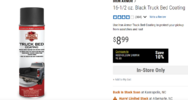
Paint the top surfaces and angles with some of the rough rubbery bed liner material.
Harbor Freight has some for $8.99 a can.
1682453848827.png
 
Seriously, though... when the tire wouldn't climb, was it pushing the ramp forward on the driveway, or did the ramp stay in place and wheel just spun?

If the ramp is getting pushed forward, a piece of canvas tacked to the underside of the ramp will likely fix the problem.

View attachment 610736
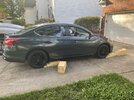
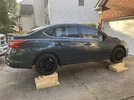
Ramp never moved that I could tell. Matter of fact, there’s no way they moved today when I used them for the second time. (That’s where tire dust pics came from). I butted the front ones up against the lip going into the garage.
 
  • Like
Reactions: Me.
Back
Top Bottom