
BurnedOutGeek
What's this button do?
Staff member
Charter Life Member
Benefactor
Multi-Factor Enabled
My 7WSM is long since gone, but thankfully the waybackmachine never forgets.
I'll get this updated for the Remington 260 and 6 Creedmoor in the coming weeks.
We always get the common questions about reloading for this and that, so I figured this last time loading for the sniper golf shoot (that I didn't even get to go to - dang back) I would take some pics and write some quick steps up for those that might want to load some match-type rifle rounds. Would I do all this much work for some .223 or .308 plinking rounds - Uh... not likely.
With that being said I spent the better part of a week prepping some brass that I got for the 7WSM and took some pictures along the way in case anyone wanted to give it a try too. WARNING: this will not be fun to most "reloaders". Now, it would be great, and would have cut down a lot of work if Lapua would start making some brass for the 7WSM
 I had to order some Winchester brass and one of the three bags came in pretty mangled albeit not mangled enough to worry about sending it back. After examining all the cases I ended up pitching about 7 out of 150, so not too bad. Well, on with the show...
Phase One: Uniforming Primer Pockets
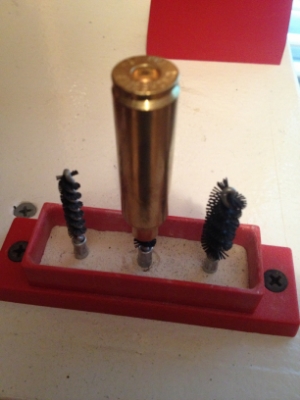
I use a Lyman kit that contains all the tools in a nice carrying case.
(except the flash hole de-burring tool in the middle sold separately)

Virgin Winchester brass before uniforming:

Primer pocket uniforming tool: This has a bushing on it to prevent it from cutting too deep.
Basically makes this operation dummy proof, but time consuming.

Just before finishing the entire pocket (and my hand is cramping up)
I go ahead and de-bur the flash hole on the inside using the de-burring tool:
(Take your time setting up the de-burring tool as to not screw up the flash hole)

Tough shot to get, but here is the inside flash hole after being de-burred.

Then make the final passes finishing up the primer pocket.

**mental note: get an electric screwdriver to do this**
Phase Two: Full Length Sizing
First time sizing I always "Full-Length" size it using Forster full length sizing die. After fire forming, I'll neck size using Redding type "S" dies. It's probably not going to do a heck of a lot since it's new,but I want to make sure the case neck lengths, and neck diameters are all the same before trimming for overall length and turning the necks.
Full length sizing I use Hornady Unique case lube (and very little of it) - it works well easily wipes off when you're done, and since I use my fingers to lube the case I use that time to examine the cases in greater detail looking for anything bad.


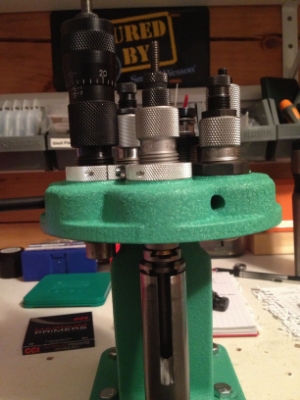
This is the Redding T-7 turret press - I'm extremely happy with this expensive sumbeech.
Full length sizing the case:

I'll get this updated for the Remington 260 and 6 Creedmoor in the coming weeks.
We always get the common questions about reloading for this and that, so I figured this last time loading for the sniper golf shoot (that I didn't even get to go to - dang back) I would take some pics and write some quick steps up for those that might want to load some match-type rifle rounds. Would I do all this much work for some .223 or .308 plinking rounds - Uh... not likely.
With that being said I spent the better part of a week prepping some brass that I got for the 7WSM and took some pictures along the way in case anyone wanted to give it a try too. WARNING: this will not be fun to most "reloaders". Now, it would be great, and would have cut down a lot of work if Lapua would start making some brass for the 7WSM
Phase One: Uniforming Primer Pockets
I use a Lyman kit that contains all the tools in a nice carrying case.
(except the flash hole de-burring tool in the middle sold separately)
Virgin Winchester brass before uniforming:
Primer pocket uniforming tool: This has a bushing on it to prevent it from cutting too deep.
Basically makes this operation dummy proof, but time consuming.
Just before finishing the entire pocket (and my hand is cramping up)
I go ahead and de-bur the flash hole on the inside using the de-burring tool:
(Take your time setting up the de-burring tool as to not screw up the flash hole)
Tough shot to get, but here is the inside flash hole after being de-burred.
Then make the final passes finishing up the primer pocket.
**mental note: get an electric screwdriver to do this**
Phase Two: Full Length Sizing
First time sizing I always "Full-Length" size it using Forster full length sizing die. After fire forming, I'll neck size using Redding type "S" dies. It's probably not going to do a heck of a lot since it's new,but I want to make sure the case neck lengths, and neck diameters are all the same before trimming for overall length and turning the necks.
Full length sizing I use Hornady Unique case lube (and very little of it) - it works well easily wipes off when you're done, and since I use my fingers to lube the case I use that time to examine the cases in greater detail looking for anything bad.
This is the Redding T-7 turret press - I'm extremely happy with this expensive sumbeech.
Full length sizing the case:
Last edited:


.jpg")


