Underhammer of Thor

Surveyor

Well-Known Member
Joined
Aug 20, 2018
Messages
536
Location
Denton
Rating - 100%
8   0   0
Been working on this project for a while.

All scratch made, because the kit thing had gotten old after two or three or however many I put together.

anyway, wife was visiting kin, and I found some time this last weekend to make some progress.

I have an imperial crap ton of pictures, but the video I think works for now. If anyone wants to see anything else, let me know.

 
That's pretty darn cool. Great job.
 
Been working on this project for a while.

All scratch made, because the kit thing had gotten old after two or three or however many I put together.

anyway, wife was visiting kin, and I found some time this last weekend to make some progress.

I have an imperial crap ton of pictures, but the video I think works for now. If anyone wants to see anything else, let me know.


Wow! Cool project. Yes I wanna see something. The end result. That thing will be epic.
 
Show us the process of making this if you would.
 
Show us the process of making this if you would.
ok.

I started off by roughing the Hammer from a 1/2"x1-1/2" bar stock, and the Trigger from 1/4" sheet. Not much too show on the actual process, because it was hacksaw, drills and files..... (some light dremel as well.)
IMG_20200118_171855090.jpg

Then I did some more shaping, drilled the pivot holes, and started some fitting.

IMG_20200120_180139673.jpg
 
Last edited:
Made the trigger bar from 3/8 x 3/4 knife steel which is too hard, but I stuck with it.

The slot for the hammer & trigger was drilled out using a 15/64 bit in a series and then the rest of the metal hacksawed or filed out.

The spring slot done in similar fashion, just using 1/16 bits and a hacksaw blade I ground down so it wasn't as deep.
 

Attachments

  • IMG_20200211_044047051.jpg
    IMG_20200211_044047051.jpg
    58 KB · Views: 13
Great work! I love scratch builds. Not enough people even attempting them anymore.
 
I can't find the ton of pics, so I'll just wax nostalgic.

The breech block is cut from bar stock, 1-1/2 by 5/8. I started by drilling the 3/4" hole for the breech plug, which is rod steel threaded to 16 tpi to match the barrel thread

Then the block is trimmed about the hole to close to final dimension.

A notch cut in the base of it to handle the trigger bar.

I dovetailed a slot in the top and cut a piece of 1/8 x 1" bar stock, which I dovetailed to fit the slot. I brazed it in, but also ran a bead if wire weld along the bottom of the joint, just because.
 

Attachments

  • IMG_20200726_111210612.jpg
    IMG_20200726_111210612.jpg
    206.4 KB · Views: 21
  • Like
Reactions: NKD
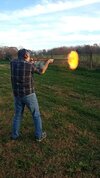
that was a small charge of 50 grains FFg. Just to see if it worked....
But the pic timing ~ muzzle flash worked out el perfecto. Compliments to your photographer!

EDIT: An actual serious question: underhammer implies the nipple is below the bbl, right? So, even though percussion caps are supposed to stay seated, have you experienced issues with caps falling off before hammer strike?

I'll presume one carries charged but not capped until ready to shoot.
 
Last edited:
But the pic timing ~ muzzle flash worked out el perfecto. Compliments to your photographer!

EDIT: An actual serious question: underhammer implies the nipple is below the bbl, right? So, even though percussion caps are supposed to stay seated, have you experienced issues with caps falling off before hammer strike?

I'll presume one carries charged but not capped until ready to shoot.
Never had one fall off. Those thin caps are malleable enough that if the nipple is undersized at all, just squish the cap to "ovalize" it a little and put it on.

If you do not have a halfcock, I'd be apprehensive to carry one charged and primed.

I did have one without a half cock notch that I put a piece of leather between the hammer body and the breech, that prevented the hammer from reaching the primer. When you actually cocked the hammer, the leather fell away and you were good to go.
 
Thats a great looking front stuffer you made. Simple and elegant.

We need video of you shooting.
 
If it was mentioned, I missed it.
Is the purpose of the under hammer to keep the flash/debris away from the shooter's face?
 
If it was mentioned, I missed it.
Is the purpose of the under hammer to keep the flash/debris away from the shooter's face?
The purpose originally as designed was to be the most inexpensive and functional at the time. With the advent of the percussion cap, and the conversion of many flintlocks to percussion, some folks just started making new designs to take advantage of the new technology, with a direct fire nipple into the barrel. Also designed were side hammers.

Many single shot underhammer pistols were purchased by settlers that weren't necessarily gun people, they just wanted something that worked.

And many rifle shooters of the day liked them because they didn't experience issues that sidelock percussion shooters did with potential fouling of the side barrel(drum).

I like it because I shoot left handed....
 
Last edited:
Range report time!
Still tweaking a load and nibbling down the front sight. When I have time.

I'm settling somewhere in the 90-100gr FFFg range.

About a month and a half ago, my drywall finisher was up working on our addition and his boy saw the gun, so I let him shoot it.

Freehand at 50 he drilled the target low by about 6" which is what I expected for me, since the front sight is still high.

Just impressed that a kid that age could poke it like that, considering he's never shot a rear peep and (fat) front blade - freehand no less, because it's heavy.

I think it will sling em just fine.
 
Back
Top Bottom