Woodworking folks

Burt Gummer

May Have Shorter Meme Posting Times Than U Normies
Staff member
2A Bourbon Hound 2024
2A Bourbon Hound OG
Charter Life Member
Benefactor
Vendor
Supporting Member
Salesman of the Year
Multi-Factor Enabled
Joined
Dec 17, 2016
Messages
21,387
Location
Julian, NC
Rating - 100%
101   0   0
Who dreams up reasons to cut up wood? Found a table saw, joiner, and a lathe for what I feel is a great price, along with a few slabs of wood. I’ve got a couple new routers, bout to order a big box of bits. Have a miter saw and a couple orbital sanders. Should be in good shape to make a few things. I’ve seen woodworking mentioned a time or two here and there. You folks share ideas, do’s and donts. Yes I know already not to cut my thumb off again, thanks.
 
If I had to start over, I would have thought out wood storage and dust collection before that side of my shop came together.
I don’t even have a shop lol. I’m gonna set this stuff up on one side of a conex and do what I can do with what I got.
 
About to start building the cabinets for our mini kitchen downstairs. I love building cabinets. May be what I do when the twins start school. I love trying to figure stuff out and then watch the project unfold
 
My suggestion as to buying router bits. Buy only the ones you need instead of a large set of bits. With the big sets you will use a few and the rest will collect dust. Spend your money to get quality bits that you really need. Same goes for drill bits.
I second this advice. You get what you pay for with router bits, preferably only 1/2 inch shank too.
 
Lets see some pics of what you’ve got. I’ll do a little flat work from time to time, working on a cutting board now, but really enjoy turning.
 
On a serious note…I love a scroll saw..tons of nifty designs and ideas out there. I was able to make christmas gifts for the whole fam damily a few years back.
 
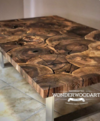
I've got a bunch of down cedar, been wanting to try and make something like this, but obviously out of cedar rounds. Need to google how to make a sled to level large slabs with my new router.

1672721465507.png
Just a heads up for the wood working folks, people sell this stuff for stupid money.

1672721644625.png
 
Need to google how to make a sled to level large slabs with my new router.
Not hard.
It’s essentially a flat base with level rails on the sides. The router goes in a tray that rides on the rails. When you put the wood in you hve to shim it so it won’t rock, then cut one side flat with the router. Flip the board and flatten the other side.

Can do the same with a powered planer, build a sled to carry the board, shim the board so it doesn’t rock, feed it through to get one side flat.

You can also do it all with a hand plane a straight edge and some winding sticks.
 
DO NOT underestimate the value of open space to work in.

I know an infinitely sized work area is impossible, but having an area sufficient to walk around a project, and all associated protuberances (clamp ends, braces, etc) is worth it.
 
DO NOT underestimate the value of open space to work in.

I know an infinitely sized work area is impossible, but having an area sufficient to walk around a project, and all associated protuberances (clamp ends, braces, etc) is worth it.
Working in tight areas sucks. I deal with that some on larger things, not a lot of space where have my saws and such. For many of my projects it's completely fine, but ripping down 2x4 into .5 strips can suck
 
I had a nice, big shop that I fully intended to use to make a few items out of wood.

It was promptly filled with golf cart, riding mower, stainless table, fridge, freezer, two tool boxes, a steel cabinet, space heaters, folding tables, assorted chairs, fuel jugs, etc., etc....
 
I had a nice, big shop that I fully intended to use to make a few items out of wood.

It was promptly filled with golf cart, riding mower, stainless table, fridge, freezer, two tool boxes, a steel cabinet, space heaters, folding tables, assorted chairs, fuel jugs, etc., etc....


Fear not. CFF has a cure for that.

 
I'm a woodworker wanna-be.
I've deliberately collected tools over the years. Table saw, compound miter saw, radial arm saw, complete shopsmith, 3 scroll saws, more routers and router tables than I can count, a jointer, benchtop and handheld sanders, brad nailers, finish nailers, framing nailer, ect.
Also have a roll around, self contained Jet dust collector. Most of the tools were picked up at yard sales and such.
I've always wanted to do intricate work, like dovetail joinery, and scroll saw artistic pieces.
So far, other than basic carpentry projects, all I've really done along the artsy line has been making Native American Flutes, which I thoroughly enjoy!
I mainly use a router table and the lathe of my shopsmith for flute bodies, and either hand carve or use one of the scroll saws for the fetish/bird.
So far I have made six flutes over the years, and I'm very satisfied with how they "look", but have yet to be perfectly satisfied with how they "sound".
I hope to start a larger project soon after retirement. I large humidor cabinet. I've been saving cedar cigar boxes for years, to have enough Spanish cedar to line the interior.
My favorite cigars come in an unfinished cedar box, with a solid Spanish cedar filler block that measures 1.75''x.875"x6", I save these for flute birds and to eventually join for building rack shelves.
for the humidor.
Back in high school I had a deal with the maintenance guy to give me a heads up when the old oak student desks were being trashed. I'd bust them apart and save the wood. Still have some of it.
I'd take the thin slats from the bottom book storage area and carve guitars out of them and sell them to classmates. Also made and sold mini slingshots from forked mountain laurel branches. Sold them with a mini pack
of BB's for $3 each. Had to stop that once the Principal found out that I was the supplier responsible for the mayhem, but I only stopped selling them "at" school.....LOL!
 
Last edited:
You'll need clamps. Lots of clamps.

These Harbor Freights are the least, but you'll also need some by Bessey or Jorgenson
457961-jpg.5828
 
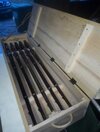
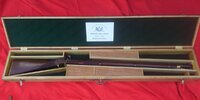
Here's my latest project. It's a replica shipping crate for the Civil War muskets we use in muzzleloading instruction. Few actual originals survive and this is a take on what they looked like while having some additions for ease of use as a self contained muzzleloading course.

It's made from poplar plank that is biscuit joined to the right width. Corners are simple butt joints with reinforcements. The butt joints were clamped into place, pilot hole drilled and square nails used per surviving originals. I added the interior reinforcement blocks for strength. A project like this is entirely within the scope of your tooling.
IMG_20221204_171124.jpg
 
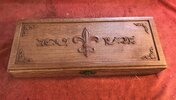
Moving up the fancy scale, this is a box for a replica 1720s dragoon pistol. I programmed the top and CNC carved it. Past that, the rest of the box is easily done with a table saw and router. The wood is 1/4 sawn red oak harvested in Forsyth Co, NC. Corners are finger jointed, something that can be done with either a table saw or router.

Case 1.jpg


Case 2.jpg
 
You'll need clamps. Lots of clamps.

These Harbor Freights are the least, but you'll also need some by Bessey or Jorgenson
457961-jpg.5828
I bought a few of the Jorgensen clamps from Lowe’s last month when they were on sale. I’ll be getting more at harbor freight soon
 
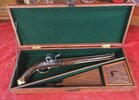
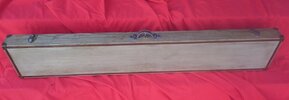
And for one more understated, but still a take on an original case, a box for a replica Whitworth rifle. Wood is 1/4 sawn red oak, oak plywood (plywood has been around for thousands of years!) and poplar dividers. You have pretty much every tool used in making this box.

IMG_20220319_143222.jpg

Exterior shot showing black walnut inlay. The black walnut came from an old tobacco barn that was built in 1870 so the tree dated to Civil War times.
IMG_20220319_143658.jpg


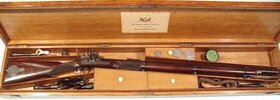
For comparison, a surviving original in the UK.
Box4.jpg
 
And something for the grandkids-

My youngest son is a USAF KC135 pilot. So I made his kids this ridem toy. At the time of construction, he was stationed at Kadena AFB in Okinawa so the toy has the correct tail markings for Kadena. The "boom" lowers so he can "tank" his cars and whatever. Engine nacelles are cut from plastic electrical conduit. This project required nothing past a table saw, router, drill and large amounts of coffee and head scratchin'
20170219_171600.jpg
 
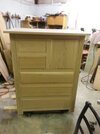
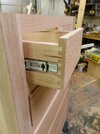
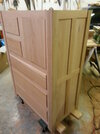
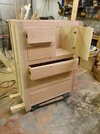
This one requires a table saw, router table and dovetail jig for a router. Wood is 1/4 sawn red oak, maple, poplar and oak plywood. All non dovetail joints are floating mortise and tenon but since making this, I've bought a hollow chisel mortiser and it would have been easier with it. Design is a mashup from a 1900s era Stickley catalog. It was a wedding present to my oldest son and his bride. It appraised in unfinished state at $3k. Since he was active USAF at the time, he wanted a figure to insure it for in case the moving monkeys trashed it during a PCS move. While this is a simplistic, understated Arts & Crafts style, notice that the drawers sit proud of the face frame by 1/4 inch. That is by design and it's not an easy thing to pull off as great precision is needed so the drawer fronts have equal gap all the way around and sit the same amount proud of the face. Not only that, the large panel on the right is a door to a compartment with shelves. That also is inset like the drawers.

058.jpg


053.jpg


050.jpg


048.jpg
 
While lots of us woodworking types love to show off our work, I'm posting these pix to make the point that you can do a lot with a modest set of tools if you know what you're doing and take time to figure things out. Sure, my toy box has grown over the years, but the key is knowing how to use the tools, having quality bits and blades, and using the most important tool, the one between your ears. None of the stuff I've posted had a "plan" or measured drawing. The chest of drawers was literally a napkin sketch of a Stickley mashup of a couple stock items from the early 1900s.

One tool I highly recommend- a quality planer. You can take rough wood and make it smooth and in any thickness you need.

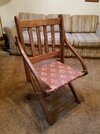
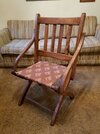
And one more set of pix- a repro of an antique folding chair from the 1850s. I saw one in an antique store and for what they wanted for it, I'd be afraid to sit in it but I wanted one to sit in. So I took a couple pix with an object of known size in the picture and extrapolated what I needed. Wood is straight grain white oak harvested in Forsyth Co, NC.

20160927_083727.jpg

20160927_083741.jpg
 
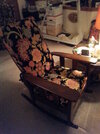
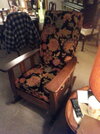
You also can get into repairing antiques and bringing them back to usefulness or for profit. In this case, the chair is an original Morris style rocker made by Binghampton and was a wedding present for my mom's grandparents in 1914. It was passed down through the family till my brother and I were doing "brotherly" (wrestling) things and broke it. Those were the days when "wait till your father sees this" was the ultimate threat, something like putting a horse head in your bed. Fast forward, at least dad didn't toss it and it sat broken and derelict in storage. Mom developed terminal cancer and I was sitting in my shop processing the news when I saw the chair and decided to make amends while I still could. I had the tools, skills and place. Time to get cracking. The resto was done by keeping the chair as original as possible and not disturbing the patina on the brass but making repair parts to match the original stain, reupholstering to a color palette and style from 1914 and having it ready when mom was released from her first hospital stay. She came home to a "new" chair on Christmas day and it was her favorite place to sit and watch her birds till she passed.

098.jpg


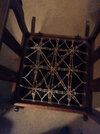
I post this because this was the mark of quality back in the day. Jute cord was used to tie a net of knots that stabilized the springs in a chair. The more ties, the higher quality. In this case, there were remnants of the cord on the springs and I was able to reproduce the pattern. The centers where the cords all "cross" is the center of the spring. There are nine springs in this chair.
157.jpg


I've never seen another like this chair anywhere so I don't know the current value, but since it's an heirloom now, I wouldn't sell it for any money. The chair is currently at my dad's and it's his favorite nap spot. He's offered it to me several times but I won't take it until he passes.
20131224_195030.jpg
 
This one requires a table saw, router table and dovetail jig for a router. Wood is 1/4 sawn red oak, maple, poplar and oak plywood. All non dovetail joints are floating mortise and tenon but since making this, I've bought a hollow chisel mortiser and it would have been easier with it. Design is a mashup from a 1900s era Stickley catalog. It was a wedding present to my oldest son and his bride. It appraised in unfinished state at $3k. Since he was active USAF at the time, he wanted a figure to insure it for in case the moving monkeys trashed it during a PCS move. While this is a simplistic, understated Arts & Crafts style, notice that the drawers sit proud of the face frame by 1/4 inch. That is by design and it's not an easy thing to pull off as great precision is needed so the drawer fronts have equal gap all the way around and sit the same amount proud of the face. Not only that, the large panel on the right is a door to a compartment with shelves. That also is inset like the drawers.

View attachment 567276


View attachment 567279


View attachment 567280


View attachment 567281
The Arts and Crafts style is something I'd like to do. My old house was built in 1930 and had many A&C features.

The simple features and lines I find attractive.

But then I see some of the turning work like what @Mirac has done and am impressed.

I should be able to get started with something. I have the major tools covered - table saw, routers, planer, drills, sanders -. I do need some good router bits, chisels, clamps and various jigs. Oh, and money
 
Most used tool is the table saw, after that is probably the miter saw then drill press. It all depends on the projects you build I guess.

I haven't made anything in a while honestly. Start with your jigs and shop furinture, it's good practice and rewarding.

I've made everything from cutting boards, my mother's urn, baby rattles and stools, picture frames, kitchen cabinets etc. It's very rewarding. Don't be hard on yourself, the real art is fixing your mistakes.
 
Picked up a Bosch palm router today new in box for half of retail. 5 boxes of sanding disks for the orbital, 220 grit. Other grits I need I’ll get on Amazon. Apparently you can get 100 of them for next to nothing there. Kreg had a sale the last month, I had been eyeballing one of their pocket hole jigs at lowes. Got a 10% off code on Kreg.com plus the sale price so I bought one. Ordered a few router bits should be here Friday. A friend gave me a scrap piece of apitong (look it up). When his family built trailers, they used it for decking on occasion. I’m gonna work on that soon with a router.
 
Picked up a Bosch palm router today new in box for half of retail. 5 boxes of sanding disks for the orbital, 220 grit. Other grits I need I’ll get on Amazon. Apparently you can get 100 of them for next to nothing there. Kreg had a sale the last month, I had been eyeballing one of their pocket hole jigs at lowes. Got a 10% off code on Kreg.com plus the sale price so I bought one. Ordered a few router bits should be here Friday. A friend gave me a scrap piece of apitong (look it up). When his family built trailers, they used it for decking on occasion. I’m gonna work on that soon with a router.
Pocket hole jig, shelf pin jig , and dovetail jig will be my 1st 3 I think
 
While I like a pocket hole jig, don't get reliant on it. It's a method that bypasses a much, much stronger mortise and tenon joint. For cabinet face frames, it's fine. For furniture, no, go mortise and tenon.
 
While I like a pocket hole jig, don't get reliant on it. It's a method that bypasses a much, much stronger mortise and tenon joint. For cabinet face frames, it's fine. For furniture, no, go mortise and tenon.
Agree 100%. Get a mortiser and a tenon jig (table saw type) for furniture. Also a bisquit jointer is really handy for other projects.
 
Back
Top Bottom