Beginner blade sharpening thread

This may have already been said. Don't leave your leather belt on your machine and walk away. It'll stretch to the point of not being usable.

On a 2x72 I have the advantage of near infinite adjustability in tension and can adjust for a stretched belt. My 1x machine and yours you really don't have that and once the belt stretches out it won't be tight enough on the wheels to run on the belt.

When you reach that point with a leather belt though don't throw it away. Cut it and make a hand strop with it and then replace it.
 
No I wouldn't put the dust on a belt for the machine. Use whatever compound comes with it.

Yes I use the diamond dust on a dry piece of leather. Smooth side. Work a dime sized or so pile of it into the pores of the leather with a finger and then strop away.
Gotcha.

To clarify, I wasn’t suggesting I’d put the dust on the belt. I was asking if the same compound I’ll use on the belt is what I’d also used on another piece of leather, and add the dust to it. But you answered that as well...no compound needed.
 
This may have already been said. Don't leave your leather belt on your machine and walk away. It'll stretch to the point of not being usable.
I think I’ve heard people mention that on several videos, but thanks for the reminder.

No issues with leaving one of the other belts on, right? Or safer to just go ahead and have no belt on it since the strop would most likely be the last one used and I’m removing it anyway?
 
Gotcha.

To clarify, I wasn’t suggesting I’d put the dust on the belt. I was asking if the same compound I’ll use on the belt is what I’d also used on another piece of leather, and add the dust to it. But you answered that as well...no compound needed.
Gotcha. I was reading that at 1am after a 4 year old smacked me in the face and woke me up. LOL.

No need to add compound then dust. But you can use that same compound on any piece of leather to make another strop as well.

I've never had a stretch problem with any belt other than leather but taking them off is a good habit to get into.
 
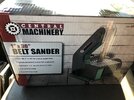
It took some arguing...but grabbed this today for $39.99 and had a $25 gift card. Passed on the extended warranty.

F71A86D9-777B-4157-B6CC-B6B3C409E9AA.jpeg

Belts haven’t shipped, leather is due here Saturday.
 
Last edited:
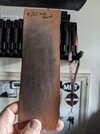
PXL_20201210_192509008.jpg

This is what your strop will look like with a little use. This is my .25 micron strop. I have others with different rouges and emulsions. I keep coming back to diamond dust though as my go to for finishing. It just works.
 
This may have already been said. Don't leave your leather belt on your machine and walk away. It'll stretch to the point of not being usable.

On a 2x72 I have the advantage of near infinite adjustability in tension and can adjust for a stretched belt. My 1x machine and yours you really don't have that and once the belt stretches out it won't be tight enough on the wheels to run on the belt.

When you reach that point with a leather belt though don't throw it away. Cut it and make a hand strop with it and then replace it.

Don’t know if this is a good thing or not but I have soaked mine in water and then let it dry, fits my machine again.
 
It took some arguing...but grabbed this today for $39.99 and had a $25 gift card. Passed on the extended warranty.

View attachment 276186

Belts haven’t shipped, leather is due here Saturdays.

I took the side plate off, all the plastic guards and the metal shelf off.
But I’m not saying you should. 🧐
 
I took the side plate off, all the plastic guards and the metal shelf off.
But I’m not saying you should. 🧐
I couldn't tell you where my plastic side plate is on my 1x machine. My 2x72 didn't come with guards and I figure it can hurt me way worse than the little one could...
 
Don’t know if this is a good thing or not but I have soaked mine in water and then let it dry, fits my machine again.

I stretched a 1x belt once. I replaced it but I cut the stretched one and screwed one end of it down to a corner of my bench. I use it like a barber strop now.

Only downside I could potentially see to wetting and shri king it would be any affect on the glue holding the joint together, but what do you have to lose once it's stretched?
 
Last edited:
Just a thought. Would it be possible to install a heavy grit sanding bet then install the stretched leather belt over it. The sanding belt would take up a touch of space and grab the stretched leather belt possibly?
 
To be honest, I've noticed some stretching, but I've left some leather belts on the sander for weeks by accident. With the tensioner built into the sander, hasn't been a problem. Not saying you should do that, though.
 
To be honest, I've noticed some stretching, but I've left some leather belts on the sander for weeks by accident. With the tensioner built into the sander, hasn't been a problem. Not saying you should do that, though.

Definitely not a good idea. They stretch fast enough without any encouragement. 🙀
 
Hoping to have some pics, initial thoughts and most likely additional questions later today...assuming I still have both thumbs.
 
Hoping to have some pics, initial thoughts and most likely additional questions later today...assuming I still have both thumbs.
I know this will sound stupid, but eye pro. I know, you'll say, 'of course!' I didn't think of it my first time.
 
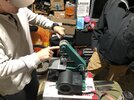
Ok, so here’s a little bit about my intro to sharpening knives on a belt sander. Sometime after this thread got started, @premise sent me a PM to say I was welcome to come to his shop and get a lesson. He has the same sander I was planning on buying. As I told him, I look at this like I did with my intro to reloading...I’ll take all the experience I can get. When I bought a press, I had three different members (one at their house, two at mine) spend time showing me some of the basics. I’m hoping I follow-up on this one a LOT better than I did loading ammo...which I haven’t given up on, I just have taken the time to do it again.

I did grab the sander earlier this week. My leather strop is out for delivery today, and my 220/400/800 belts are due here Thursday last time I checked. Once all that arrives, @pinkbunny will make a visit here to go over his way of doing it using my actual supplies...really looking forward to that as well.

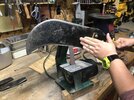
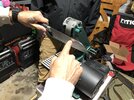
So we decided to start off with a basic sharpening job and got to work on :

0CD6FB53-BF29-4946-B6B0-90D7009BED69.jpeg

😂😂😂

(That’s one of his work tools he was using to show me about following the shape of the blade, much later in the lesson.)

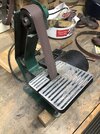
I haven’t even taken my sander out of the box, but for somebody that hasn’t seen one they’re smaller than you might be thinking...

9509A69C-6C87-4E8F-9847-B1DEDEF84E17.jpeg

It should be somewhat logical, but it hadnt really clicked in my mind. think about a 30” belt being formed into a triangle. It’s not equilateral, but picture three 10” sides. If you imagine the vertical portion of the belt where you actually sharpen the blades being 12” or less, you can get a good idea.

In prep for today I’d bought a super cheap 3-piece set of knives from Walmart...a paring knife, utility knife, and a chef’s knife. Maybe 3”, 5” and 8”? I knew they wouldn’t behave like blades made of good steel, but they would allow me to get the motion right without screwing up anything expensive. I also grabbed a 2-pack (paring and utility) of Cuisinart knives, making sure nothing I bought was a serrated blade. Additionally, I brought a couple knives I got from the S&W sales around Black Friday, one of my Ganzo EDC blades, and my wife’s Wusthof santoku. (Plan all along was just let Matt sharpen the good one 😎)

...to be continued. Gotta go pick up my son from Concord Mills. Uggh.
 
To y'all who have the 1x30, do these bog down easily during normal edging/sharpening? (I don't expect 2x72 2hp performance)

I've got an old 1x42 craftsman and it slows down quick unless you only use the very slightest touch when sharpening.
 
I have the same machine and mine doesn't bog down at all. I even used it to shape a sledge hammer handle and it gnawed on it no problem.
 
Last edited:
To y'all who have the 1x30, do these bog down easily during normal edging/sharpening? (I don't expect 2x72 2hp performance)

I've got an old 1x42 craftsman and it slows down quick unless you only use the very slightest touch when sharpening.
I can bog it down doing actual sanding, but if you bog that thing down just sharpening you've already ruined the blade
 
Ok...finally done with stuff and ready to continue.

First step was to have him demonstrate sharpening a little knife he had. It’s visible in one of the pics above and blurry in the background of one that’ll be posted later. Brown wooden handle and a blade maybe 2.5”-3” long. He sharpened it, then bounced the edge off the workbench and a couple nails and I took my turn. My initial impressions:

1. It’s a lot more effort than it looks to draw a blade across the belt at a constant speed than the pros make it look, especially keeping it in the same position vertically (meaning not going higher or lower on the belt)
2. It’s going to take a lot of repetition trying to get my left hand and right hand to do the same thing. One of the main issues was trying to hold the same angle. IIRC he said I actually held a more proper angle with my left (weak) hand than my right.
3. I had a problem focusing on one thing, and forgetting others. For example, I’d try to make sure I was holding the right angle and not realize I was two inches lower (or higher) on the belt than the last time. And that means the amount of slack was different, and I’d end up with a different bevel on each side of the blade even if I managed to hold it at the same angle.
4. I can see the light, but it’s gonna take practice. Knowing where to start, when to move to the next grit, and when to know I’m done...or when to know I need to either start over or go back a step.
5. There’s a massive difference in working on a cheap knife vs quality steel.
6. Not screwing up the point of the blade is going to be a major point of focus going forward.

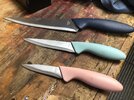
We started with the three cheapo knives from Walmart. Mainstays brand (or whatever the house brand is). Very thin and cheap steel, but I wanted to have something I didn’t care about messing up at all. All of them ended up with a pretty decent edge. I imagine they won’t stay that way after much use, but that’s ok.
636E42FC-BDD0-480F-B8D6-98C0CB562EBA.jpeg

I think we went ahead and let him sharpen the santoku at this point so we didn’t run out of time and not get to it. After that we started on the two S&W knives. One was a fixed blade, and it was really heavy and thick. Brand new, never been out of the box. Didn’t take a lot of work to clean it up ready to go. Same goes for the other one which almost looked like a razor knife. Can’t remember what he said that profile was called. Pretty sure they were the same steel, just not the same thickness. Didn’t spend much time on either of them, but they’re sharper than they were. You can see them in this pic:
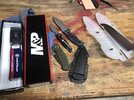
F36E6460-405E-4CEB-8184-5AB0AAB122E9.jpeg

I think he said his best guess was those two were made from whatever their equivalent of D2 steel was? The last one was the Ganzo that’s folded closed in the pic above. It’s a 440C blade. Sharpened up real nice.
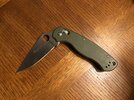
BD18B474-753C-437C-8EAB-F7D9AAFA1997.jpeg

Definitely a positive and productive first lesson. Can’t wait to try again. I didn’t touch the two Cuisinart blades, so those will get their turn when pinkbunny comes to visit, along with some of the other Wusthofs.

Premise showed me this item which I’ll pick up my next trip to HF...a sanding belt cleaned. $8.49 before any coupons.
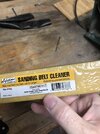
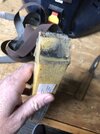
1BE23BBE-D84B-4E58-B709-D272038B6D47.jpeg
F1DB4727-6107-410B-A658-A787B3286CB6.jpeg

I want to say thanks to @premise for his time today. I also left his house with a parting gift...a brand new two-side stropping paddle he made.
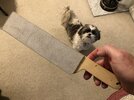
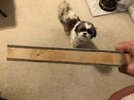
EF671D13-C4D5-45A1-9574-792A94A75FA0.jpeg
79B1AEF9-097D-48EA-A194-6F5BAF99639A.jpeg
 
And I only cut myself once after I got home and was checking out the blades. 😳
 
Two other thoughts after reading my posts again.

1. Figuring out how to hold the knife to keep a constant pressure on it was a something that stumped me most of the day. I tried one-handed. I tried using a fingertip from my free hand to keep it aligned. I even came up with some random method of using my index finger knuckle as a guide. Consistency is going to be key, so I need to figure that out and then stick with it.

2. I need a good spot to use the sander. My garage is full of stuff, with shelves all the way around, and I don’t have an actual work bench. Going to have to use a card table for the short term. I went to two Goodwills today, and aiming for another one plus a couple HFH ReStore locations next week. Just looking for something that’s the right height to use standing up. I do have another option...the crawlspace. Mine it tall enough to have a 6’ door. Yard is sloped front to back, so the last 10’ or so of the crawlspace has a bout 8’ ceilings (narrows down to 3’ or so up at the front of the house). I could easily build a working platform to mount to the visible studs. Decent light under the house, and power wouldn’t be hard.
 
Take a look at these mobile workbenches. I bought one and mounted my 6" vice to the top of it and I can roll it to where I need it. I got this one with the 2 cabinets, but they also have one that is all drawers. You can store a lot of stuff in them.

 
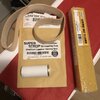
Strop belt and compound showed up Sat. Stopped by HF today and grabbed one of these at 20% off.

04A3C3DD-9306-4218-85C9-36C00D388294.jpeg
 
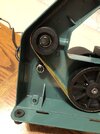
I decided to go ahead and pull the sander out to make sure it wasn’t DOA. Got the side plate removed. Cut the shield/cover on the top so it just blocks the curve at the top and leaves plenty of room in the slack part of the belt.

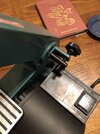
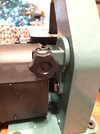
But I do have a question/problem. I know when I was working with @premise on this same sander, we could grab the knob on the back-right side of the frame, put our thumb in the inside of the frame opposite the lower pulled, and pull the knob toward us to get slack in the belt for removing & installing.

The manual says to turn the knob all the way in order to get that slack. Is there a modification that needs to be done to allow it to work like premise has his set up? We could still turn the knob on his to get the belt into the center of the top pulley.

oh yeah, the sander seems to run just fine

They change it? Photo of that area?
 
They change it? Photo of that area?
62397F36-C4A8-4900-97F8-69651E5097F8.jpeg
574055DE-E34A-4636-B488-B3A3ED6D99D3.jpeg
478CE9EE-D4C0-4062-A997-15955C05E2EA.jpeg

Maybe barely loosen the nut on the bolt at the bottom of the bracket? Or does it look different than yours?
 
Alright, ya'll talked me into it. Will be ordering a leather belt for my 1x42 tomorrow. @BigWaylon I may have missed it but what type of belts did you order, silicon carbide?
 
Alright, ya'll talked me into it. Will be ordering a leather belt for my 1x42 tomorrow. @BigWaylon I may have missed it but what type of belts did you order, silicon carbide?
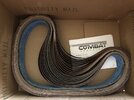
I ordered the belts from Combat Abrasives that RR recommended on page 1. Pinkbunny also put a link up on page 1 for some different ones.
 
That's the same style of tensioner that is on my Delta sander that will bend over time and not have any more adjustment. Could not keep belts from tracking off and the part is no longer available. I did find that one of the Grizzly sanders uses the same mechanism and ordered 2 for just a few dollars each.
 
Thankfully mine has a spring loaded arm to set belt tension but I should show ya'll the tracking adjustment on my 1x42. What a joke.
 
@draco88 and I sharpened several knives under the watchful eye of @pinkbunny today. Then I sharpened another 7 (maybe 8?) after they left. Amazing how quick it goes when you’re not trying to socialize at the same time!

Just a couple pics for now:

F0849388-F141-4C85-A826-4C60D90EB61E.jpeg
F06172A2-FC18-45A1-A9A7-DE084CF3E2C9.jpeg

I’ll add some more commentary later. Hopefully one or both of them will as well.
 
I think the big takeaway is that there is no one best way to do it, just to find what works best for you, and go with it.

@premise likes to angle the sander to set the angle, I like to freehand it.
Some people to individual strokes to have more precise control, others like to rub the knife back and forth, so you don't mess up the tip.

What matters is base, angle, pressure, and being able to do that consistently.

Both @BigWaylon and @draco88 were able to produce very sharp edges, and reprofile dull knives very quickly. A lot of the stuff, like controlling angles near the tip, will just come with time, but they picked it up quick, and found it easy to do, I think.
 
Back
Top Bottom