Hand checkering 1911 front strap. Anyone done it?

Looking forward to seeing the results. (Good = inspiring! Bad = lesson for the rest of us.)
It reminds of an old saying:

“Either you can be a good example,
or a terrible warning.”
 
Okay, so in the course of ninety minutes I managed to make an enormous mess of the beginning of an otherwise well planned and prepared project.

And rather than double down on the ensuing disaster, I stopped, cleaned up the mess, and by cleaned up the mess I mean “erased it” with a great big rat bastard file, some 220 grit, and put a fresh piece of Dawson grip tape right back where it was to begin with.

What are the lessons we can learn from this?

A) “A man has got to know his limitations.” - Clint Eastwood

B) “'Tis better to have tried and failed, than never to have tried at all.” - adapted from Alfred Lord Tennyson

C) Checkering is like shooting pool. It’s all in the right hand.

D) Arthur-itis in your right hand is the enemy of checkering projects.

The victim in triage, right before breaking out the bastard file to clean up the mess. It may not look bad, but I had just broken out the Dykem layout fluid to cover the disaster that had already started twenty minutes earlier to see if there was hope for correcting what was looking like a terrible start. And the truck headlight is not as close at it looks.

6CBFB08B-046D-4CA4-A59E-02EA798DDFE1.jpeg
 
Last edited:
Bring it over. We'll buff it out, polish it smooth and then bead blast it. Only person who will know is you.
I actually corrected 98% of what I started, and the rest is under grip tape. I liked the Dawson “sandpaper” honestly, and this thing is going to end up getting shot and beat up way more before it’s over. I just wanted to see if I could do this.
 
Last edited:
What were you unhappy with? From what I can see in the pic, it doesn't look like a bad start.
 
What were you unhappy with? From what I can see in the pic, it doesn't look like a bad start.
It was as if the guide I had secured was moving. What started as a very finely cut group of lines very quickly got sloppy and wide. I figure if it was this sloppy this early on that it would get worse quickly due to how this job is done, and exponentially.
 
At least you didn’t use a dremel tool. Imagine the horror
 
funny this thread comes up now. I started this last night and it looked terrible to start with. The deeper you go, the better it looks. I have the horizontals full thickness now and getting ready to start on the vertical cuts.
 

Attachments

  • 51FE047E-4943-4283-989A-AEE62EAD394E.jpeg
    51FE047E-4943-4283-989A-AEE62EAD394E.jpeg
    46 KB · Views: 62
  • CD842C99-CC1F-4F30-9C1D-403E1BE52052.jpeg
    CD842C99-CC1F-4F30-9C1D-403E1BE52052.jpeg
    41.4 KB · Views: 63
  • CA24E725-1E88-4FA0-BA2B-E5B3C176CF58.jpeg
    CA24E725-1E88-4FA0-BA2B-E5B3C176CF58.jpeg
    52.5 KB · Views: 64
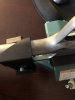
Always something, even before the frame is stripped...
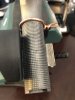
Two of the grip bushings are softer than whatever Springer used to glue them in. Nothing a vise grip couldn’t resolve. New bushings are ordered.

View attachment 177060

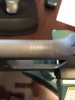
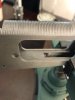
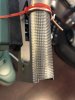
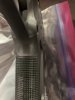
Next up, Brownells says I have to properly prepare the checkering file for actual use. They say I have to knock off the row of partial teeth along the outside edges with a belt sander before I can start actually checkering. What a PITA.

I think I’m going to take a stone to that row on the bottom left and just use that side of the file.

View attachment 177062


Wait... So you order a special tool to do a special job and it has to be modified to do the job? That's enough to put me off a job...
 
Wait... So you order a special tool to do a special job and it has to be modified to do the job? That's enough to put me off a job...
One of the custom smiths over on a 1911 forum concurred that it should done. I was more than a little annoyed.
 
yes, Grobet file. OO, 20 LPI and it does have the half tooth on one side. I have just been using the other side for the whole thing
I talked to Grobet about having to prep the file and they told me to talk to Brownells where I bought it. Of course there is no other discussion anywhere about it except for the Brownells instructions which I’m pretty sure was a well kept secret till the file arrived.
 
I talked to Grobet about having to prep the file and they told me to talk to Brownells where I bought it. Of course there is no other discussion anywhere about it except for the Brownells instructions which I’m pretty sure was a well kept secret till the file arrived.

Of course. The one I got from Amazon came with zero documentation, so I started hacking the frame with it as is. The side with the grobet logo works fine, but the other side caught and jumped around.

One thing I know is next time I will pay someone to do this. It has come out looking pretty decent, but I have about 12 hours tied up in it and I can't feel my fingers anymore. Also went through two pairs of gloves.
 

Attachments

  • A121A1B3-0765-4013-82A0-63BAC2A74ED2.jpeg
    A121A1B3-0765-4013-82A0-63BAC2A74ED2.jpeg
    67.3 KB · Views: 56
Of course. The one I got from Amazon came with zero documentation, so I started hacking the frame with it as is. The side with the grobet logo works fine, but the other side caught and jumped around.

One thing I know is next time I will pay someone to do this. It has come out looking pretty decent, but I have about 12 hours tied up in it and I can't feel my fingers anymore. Also went through two pairs of gloves.
That looks good!
 
Of course. The one I got from Amazon came with zero documentation, so I started hacking the frame with it as is. The side with the grobet logo works fine, but the other side caught and jumped around.

One thing I know is next time I will pay someone to do this. It has come out looking pretty decent, but I have about 12 hours tied up in it and I can't feel my fingers anymore. Also went through two pairs of gloves.
I’d be real interested to see what the top of your front strap looks right under the trigger guard once you take that wire stop off. A friend undercut his trigger guard which cleaned up those lines, but I’ve shot this pistol so much without a trigger guard undercut that I would leave mine alone if the checkering did not need cleaning up.
 
I’d be real interested to see what the top of your front strap looks right under the trigger guard once you take that wire stop off. A friend undercut his trigger guard which cleaned up those lines, but I’ve shot this pistol so much without a trigger guard undercut that I would leave mine alone if the checkering did not need cleaning up.

I haven’t quite figure out how to blend the top yet, that’s the next project. I cut one extra horizontal line at the top pretty shallow and doesn’t have vertical cuts to hold the wire stop, so I am hoping to just blend that down a little so the checkering sits a little proud of the frame.....we’ll see how it goes, but it is my intention to not undercut either.
 

Attachments

  • BC62A1DB-D8F2-47D9-8C9C-ABD0FD42DF38.jpeg
    BC62A1DB-D8F2-47D9-8C9C-ABD0FD42DF38.jpeg
    50.1 KB · Views: 23
Isn't this sort of thing the reason CNC machines were invented/built? Just buzz it in at the factory? Why in 2020 are we still doing this by hand?

Ya' know if you would have gotten a Glock you could have claimed the mess was a 'kustum' stippling job worth $300 when you give up and try to unload it.


For me, it would just be the satisfaction that I did something, by hand. Nothing to do with trying to save money or any other reason. I look at it as trying to keep alive some of the lost arts.

I started collecting ( accumulating ) hammers in the past year or so. Old, rusty, $1-$2 stuff from yard and estate sales, pretty much anything but claw hammers. I truly enjoy spending the time with each one trying to bring it back to life, more in the way of conservation than restoration.

.
 
Last edited:
For me, it would just be the satisfaction that I did something, by hand. Nothing to do with trying to save money or any other reason. I look at it as trying to keep alive some of the lost arts.

I started collecting ( accumulating ) hammers in the past year or so. Old, rusty, $1-$2 stuff from yard and estate sales, pretty much anything but claw hammers. I truly enjoy spending the time with each one trying to bring it back to life, more in the way of conservation than restoration.

.


Yep, this is it. I could go to the gun store today, throw my card on the counter and walk out with exactly what I wanted, but someone else made it and it would be like everything else in my safe. Instead I have a giant bin of parts trying to make them into something functional that I can pass on to my kid one day. That and I enjoy tinkering with guns just as much as I enjoy shooting them.
 

Attachments

  • IMG_1178 (1).jpg
    IMG_1178 (1).jpg
    59.7 KB · Views: 33
Last edited:
Why in 2020 are we still doing this by hand?

Because we want to. The same reason I built a second story deck myself on my last house that I could have easily paid someone else to build.

Likewise the fireplace I built in my backyard this year. Or the curving sidewalk of cut brick I built around my house, or the exhaust system I put on a Cobra in my garage.

Some of us like to see the work of our hands.
 
@LesBaer45 It is also my understanding from a mid 2018 post by a Les Baer smith on another 1911 forum that he hand checkers their pistols, in addition to hand fitting their slides and frames, which is of course a hallmark of Baer pistols, the hard fit that is.
 
Last edited:
They taught us in business school that it is the responsibility of the communicaTOR, to get the point across to the communicaTEE.
 
Last edited:
So, here is the start of the blend.... not sure if I like one large cut at the top or for it to blend into the curve of the trigger guard
 

Attachments

  • 633883E3-DF27-4ACA-ACA5-3FDB7ADDB90D.jpeg
    633883E3-DF27-4ACA-ACA5-3FDB7ADDB90D.jpeg
    73.3 KB · Views: 35
Isn't this sort of thing the reason CNC machines were invented/built? Just buzz it in at the factory? Why in 2020 are we still doing this by hand?

Ya' know if you would have gotten a Glock you could have claimed the mess was a 'kustum' stippling job worth $300 when you give up and try to unload it.

Some of the high end CNC mills only come with 0.5mb of memory. Yes, 0.5mb. If you want to be able to store programs, you have to buy a server at the tune of 5k. Can't be any server, has to be their server.


While I love working with my hands, I love the tech side of things as CNC equipment that has landing me some pretty awesome gigs. Such like prototyping for firearm manufacture in NC, starts with "R"


So, here is the start of the blend.... not sure if I like one large cut at the top or for it to blend into the curve of the trigger guard
I would fade it out to where you have it out now. Trying to go around the trigger guard radius is a compound surface, not great for that wide file unless you have a smaller round file that would let you get 2 lines in per pass. If I'm mistaking in that radius, my apologizes in advance.
 
Some of the high end CNC mills only come with 0.5mb of memory. Yes, 0.5mb. If you want to be able to store programs, you have to buy a server at the tune of 5k. Can't be any server, has to be their server.


While I love working with my hands, I love the tech side of things as CNC equipment that has landing me some pretty awesome gigs. Such like prototyping for firearm manufacture in NC, starts with "R"


I would fade it out to where you have it out now. Trying to go around the trigger guard radius is a compound surface, not great for that wide file unless you have a smaller round file that would let you get 2 lines in per pass. If I'm mistaking in that radius, my apologizes in advance.

I initially cut down at the top of the checkering to clean up some spots where I went to far with the vertical lines, but once I have them all cleaned up, I kinda like the one wide line at the top instead of blending it.... waffling back and forth on leaving it or blending on up
 

Attachments

  • C8B3F644-3464-4254-96D5-23E8B619DD3E.jpeg
    C8B3F644-3464-4254-96D5-23E8B619DD3E.jpeg
    110.1 KB · Views: 28
I initially cut down at the top of the checkering to clean up some spots where I went to far with the vertical lines, but once I have them all cleaned up, I kinda like the one wide line at the top instead of blending it.... waffling back and forth on leaving it or blending on up
I like the thick relief cut, it's different.
 
Colt does something similar on some of their front strap checkering jobs.

And if you can bead blast it it will look like it was always that way from the factory.
 
Last edited:
And if you can bead blast it it will look like it was always that way from the factory.

It’s a bare carbon steel frame, so I plan to bead blast and send it out for pvd or a coating of some sort when I get everything else done....I am tempted to send it to trumbul for color case hardening, but they are extremely spendy. I still have a magwell to blend and the back strap to checker, so I am in for a lot of hours before this thing is ready for finishing !
 
Last edited:
It’s a bare carbon steel frame, so I plan to bead blast and send it out for pvd or a coating of some sort when I get everything else done....I am tempted to send it to trumbul for color case hardening, but they are extremely spendy. I still have a magwell to blend and the back strap to checker, so I am in for a lot of hours before this thing is ready for finishing !
Whose frame is that?
 
Colt does something similar on some of their front strap checkering jobs.

And if you can bead blast it it will look like it was always that way from the factory.

I got a bead blaster you are welcome to


Sent from my iPhone using Tapatalk
 
Last edited:
Back
Top Bottom